LADMF User Manual
LADMF User Manual
Overview
This document is intended as a User Manual for various users or agencies to register and gain access to the Limited Access Death Master File data.
The LADMF System is best navigated with the following 4 parts in mind:
Part 1 – User Profile (for all Home Page features and options)
Part 3 – Searching the Limited Access Death Master File site
Part 1 - User Profile
-
Introduction to LADMF
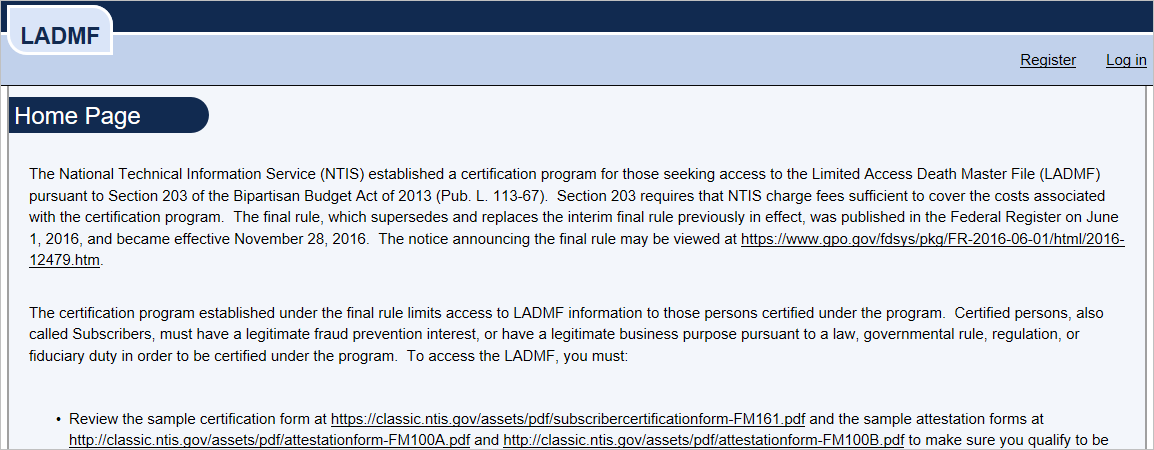
Please use the following URL for accessing the Limited Access Death Master File: https://ladmf.ntis.gov
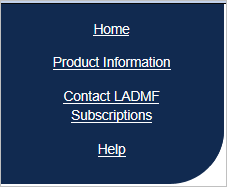
This is the initial LADMF screen, or 'Home Page':
-
Create a New Account at the 'Register' screen
When you first use the LADMF system, you will need to Register by creating a Login profile.
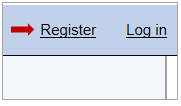
Step 1: From the Home Page, click on 'Register' in the upper right corner of the page as shown below:
You should see a pop-up for the Privacy Act Statement. Read through the Privacy Act Statement and click 'OK'.
Step 2: Enter your data into the following fillable Registration form:
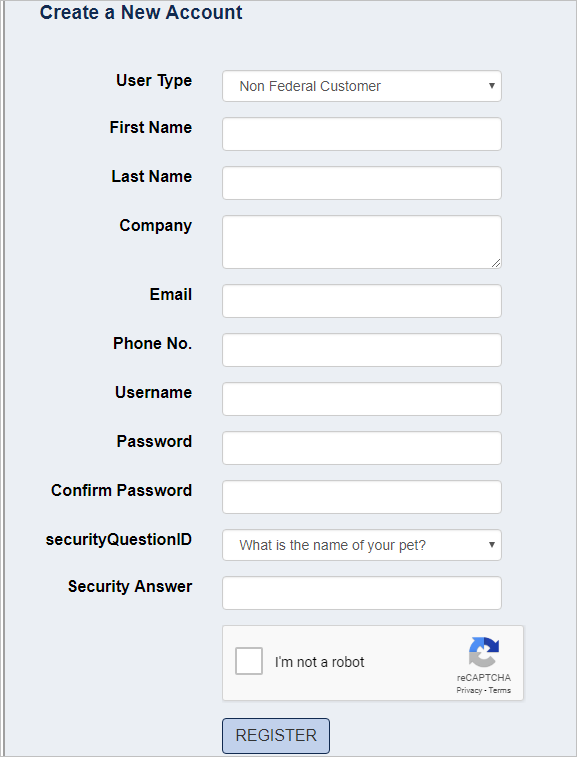
Specific field criteria: All fields are required.
- Select the appropriate User Type.
- Provide your name and email address (which will be used to confirm your registration).
- Note that the email addresses must be unique within LADMF. If you create a second profile account, you will need to use a different email address.
- Company name is required. You may simply input "Self" if not representing a company.
- Your Username may not be your email.
- Your password must be a minimum of 14 characters and maximum of 16 characters long, with both lower and uppercase letters, and at least one digit and one special character (ex: !, @, #, $, &, or *); A password may not contain the word 'PASSWORD'.
- Choose a security question.
- Key in the answer to the security question.
Step 3:Once you've entered all data and verified it, click on the "I'm not a robot" check box for the CAPTCHA1, click the 'REGISTER' button.
Registration is complete. Your Home Page should now resemble the following:
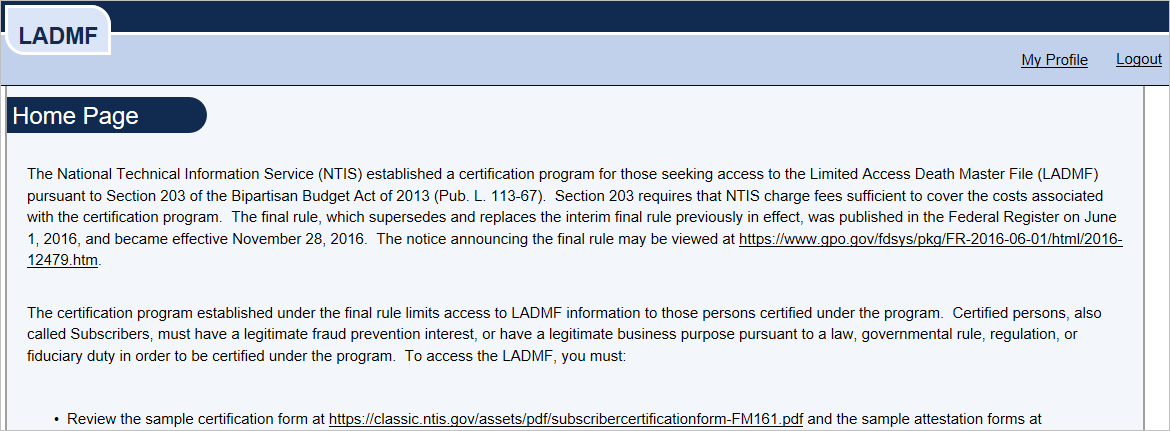
Please review the information on the Home Page. Non Federal users must be certified to have access to the Limited Access Death Master File. If you are a Non Federal Government user, you will not be given access until you are certified, so the information on the home page is important to read all the way through.
-
Forgot Username or Password
Step 1: From the Login Page, you'll need to click 'OK' to the Department of Commerce Notice of Consent box.
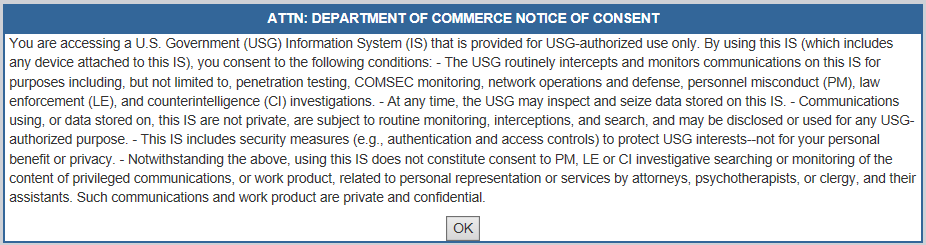
Note: Each time you visit the Login page, you will need to accept the Consent Agreement.
Step 2: Click on the link you need to either recover your Username or to reset your Password. Both are found under the 'LOGIN' button and circled below.
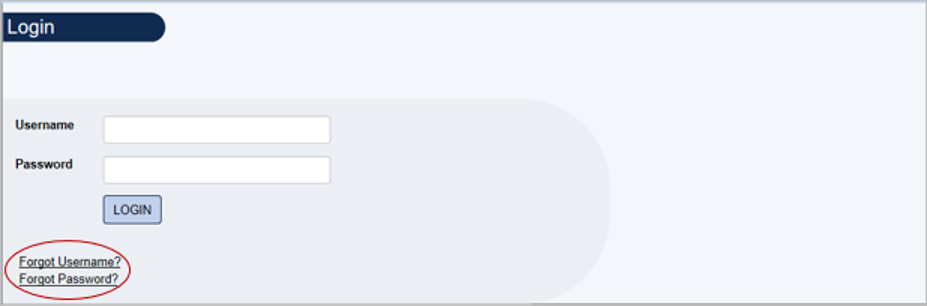
Either option will present you with similar screens where you will need to enter your email address, click either 'SEND USERNAME' or 'RESET PASSWORD', and follow the instructions provided in the body of the email you will receive at the address you provided to register your account.
-
Updating Your Profile
Note!
You will only be able to change information in your Profile AFTER the NTIS admin has populated your profile with a Customer ID and Legacy ID!
Step 1: To change information in your Profile, click on the 'My Profile' link in the upper portion of the screen:

Step 2: You will see the Profile screen for your User Account, with the information you already provided displayed. You can change fields except the Customer ID, Legacy ID 2 Company and Email fields and then click on 'UPDATE' to save your changes. You may also change your Password and/or Security Question and Answer from here. See the example below:
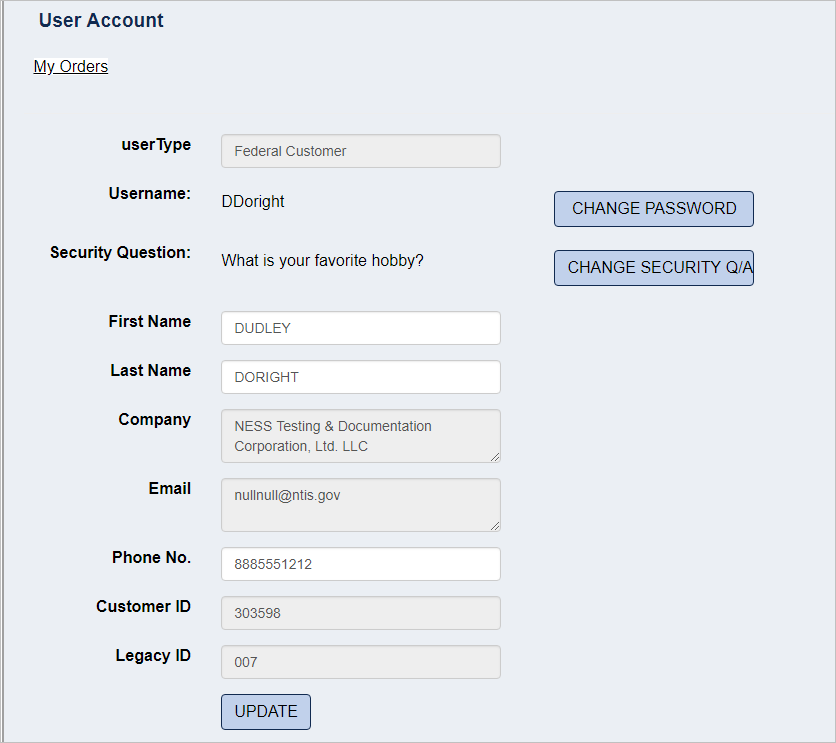
Note: You can see My Orders from this screen also. More on that later in this manual.
After updating any of your information, you should see a similar screen with the addition of the 'Profile has been updated successfully.' message.
If your profile does not yet have a Customer ID value, which is entered by the NTIS admin, you will not be able to save profile changes and will see a message as in the below screen.
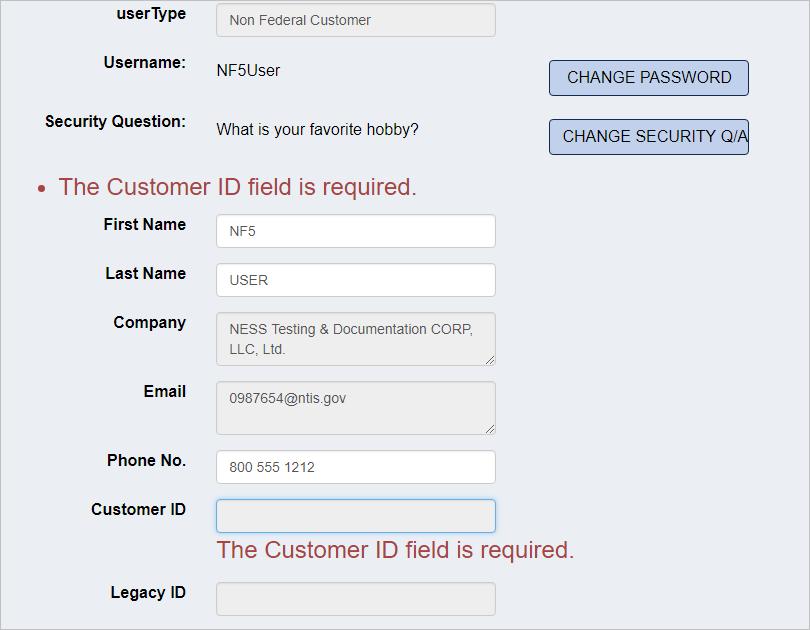
Contact the NTIS admin at the "Contact LADMF Subscriptions" link on the left hand side of the page.
Part 2 – Product Information & Managing Users
Now you are ready to purchase product subscriptions that will allow you to use the Search functionality within LADMF.
Step 1: From the Home Page, click on 'Product Information' from the navigation menu:
This will bring you to the LADMF Product Information screen as shown below:
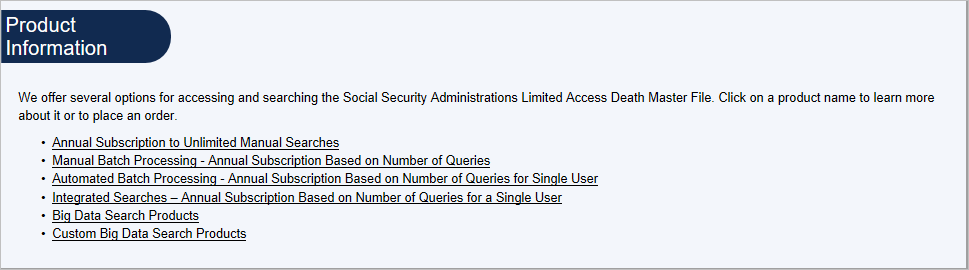
This screen informs you of the list of products currently available and links to more detailed information and subscription types for each product and provides links to subscribe to each product.
-
Selecting and Purchasing a Product
Your Product choices listed on the Product Information screen are as follows:
- Annual Subscription to Unlimited Manual Searches
- Manual Batch Processing - Annual Subscription Based on Number of Queries
- Automated Batch Processing - Annual Subscription Based on Number of Queries for Single User
- Integrated Searches – Annual Subscription Based on Number of Queries for a Single User
- Big Data Search Products
- Custom Big Data Search Products
Step 1: Select the Product by clicking on its link:
Note: The process for selecting any other of the "Active" products is similar to this one with subtle differences in product behavior. The 'Web Service Inquiry Products' are used differently via an API, and how to use the API is documented in the API Manual.
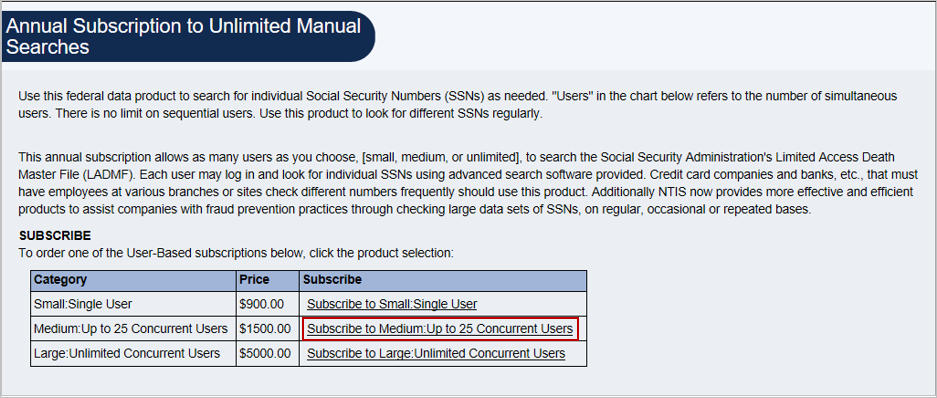
For the purposes of this User Manual, we will use the first option 'Annual Subscription to Unlimited Manual Searches' and subscribe to the middle (Medium) option, 'Subscribe to Medium: Up to 25 Concurrent Users'.
Step 2: Once on the following screen, choose the subscription option Category 'Medium: Up to 25 Concurrent Users' by clicking on 'Subscribe to Medium Up to 25 Concurrent Users' in the table under the word 'Subscribe'.
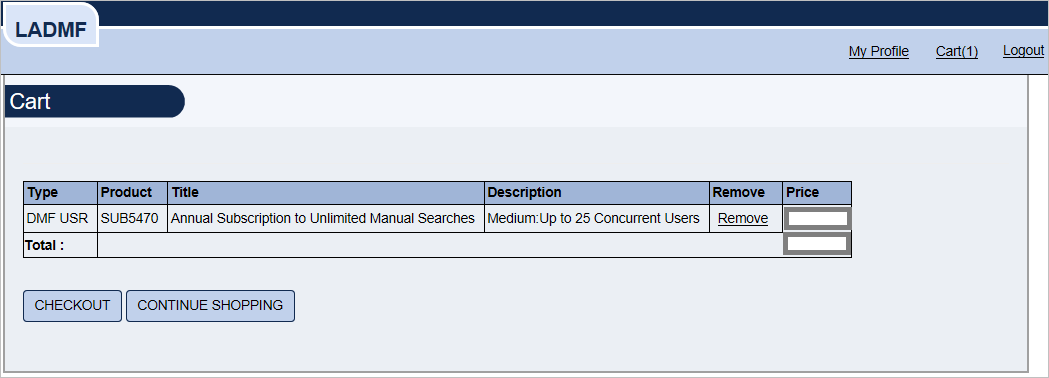
Step 3: You will then be taken to your Cart where you will see your Product ready to be purchased. Click the 'CHECKOUT' button on the lower left.
Step 4: Once at the 'CHECKOUT' screen, choose 'OK' on the Privacy Act Agreement popup, input your 'Billing Address' and select 'Continue' to move to the next screen.
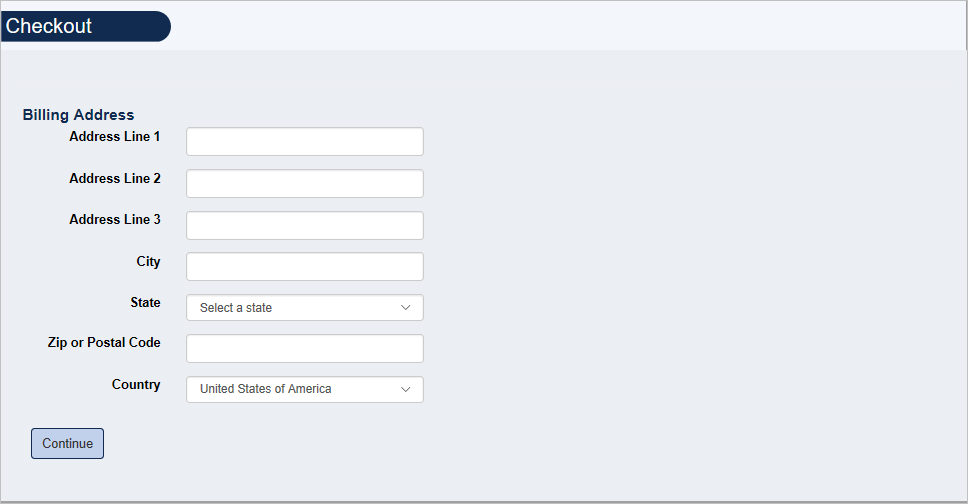
Note: You will see the Privacy Act Statement anytime you are entering private data, such as Billing Address or Payment Information. You saw this when Registering your Profile account.
Your billing address is saved only to be used during credit card processing. You will need to reenter your billing address for any subsequent orders.
Once you've entered your Billing Address, click on the button 'CONTINUE' to move to the next screen.
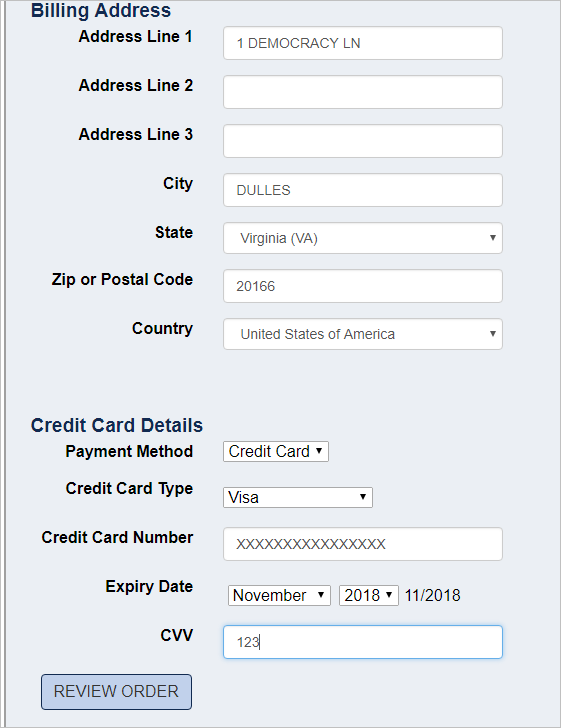
Step 5: The next screen is where you input your 'Payment Details'.
Any credit card information you provide (if you pay with a credit card) will only be saved until the credit card is processed for your order. Note that payment is accepted by IAA, wire transfer, credit card and check. The information is not saved beyond that and you will have to reenter credit card information for any subsequent orders.
After inputting your information, click 'REVIEW ORDER'.
Step 6: Review your order and click 'CONFIRM ORDER':
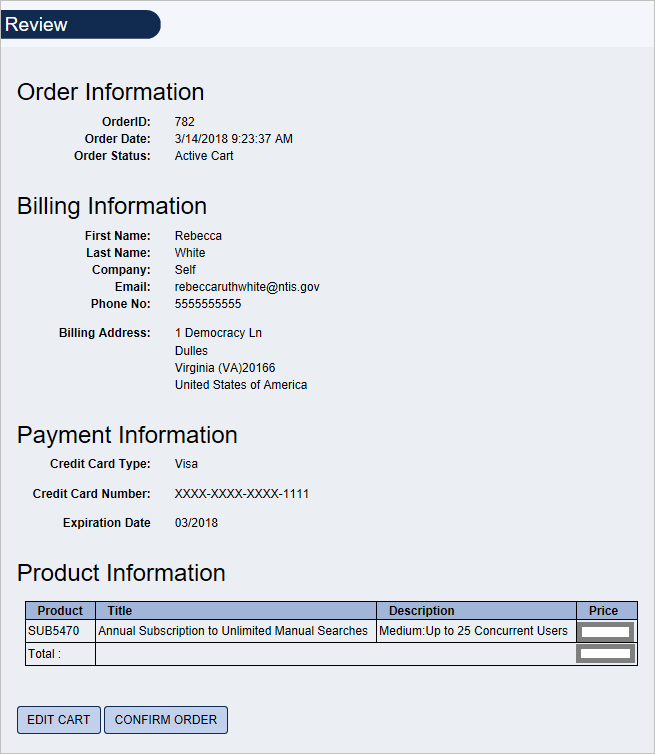
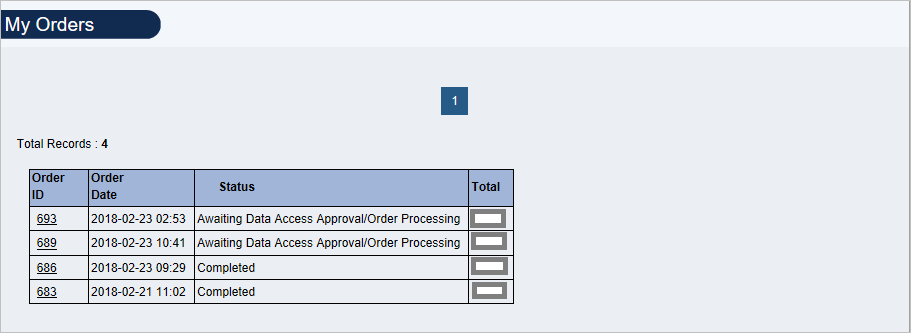
The system will refresh this screen, confirming your order and you will see all the same information as the screen above except you should see an updated Order Status and you should now see the 'GO TO 'MY ORDERS'' button to be able to see this and any other orders you've placed in one location.
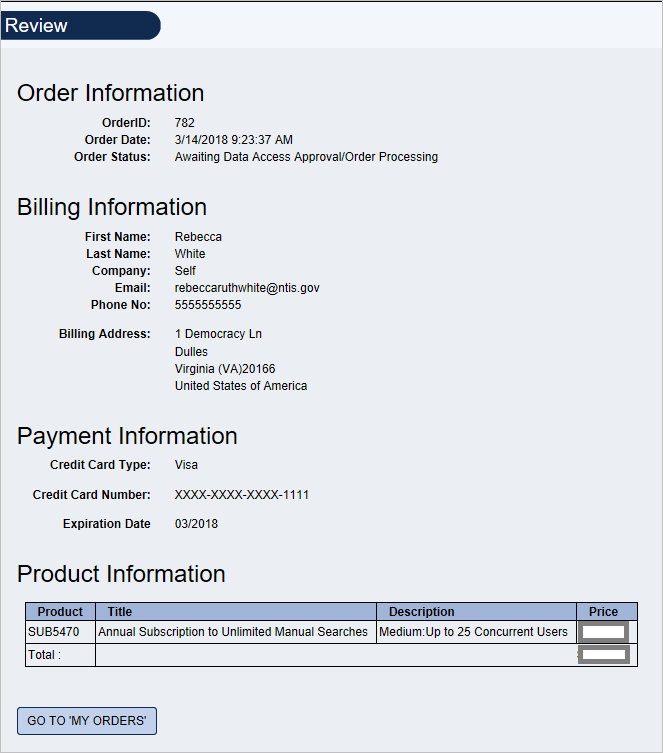
Note: The system will send you an automated email to let you know that your order was received.
This button will take you to your 'My Orders page.
At any point, you may get to your orders, which may be "Awaiting Data Access Approval/Order Processing" or Completed orders, by clicking on 'My Profile' in the top right of your screen and selecting 'My Orders' at the top of your profile.
-
My Subscriptions & Managing Users
My Subscriptions
Your purchase must be approved, you must have a valid Certification if a non Federal Government customer, and the payment must be processed before you can access the Limited Access Death Master File for Search functionality.
Notice the following two orders in this example show order Status as 'Awaiting Data Access Approval/Order Processing' and the others as 'Completed'. Your order will show 'Completed' only after it is approved, and your credit card or other payment has been processed.
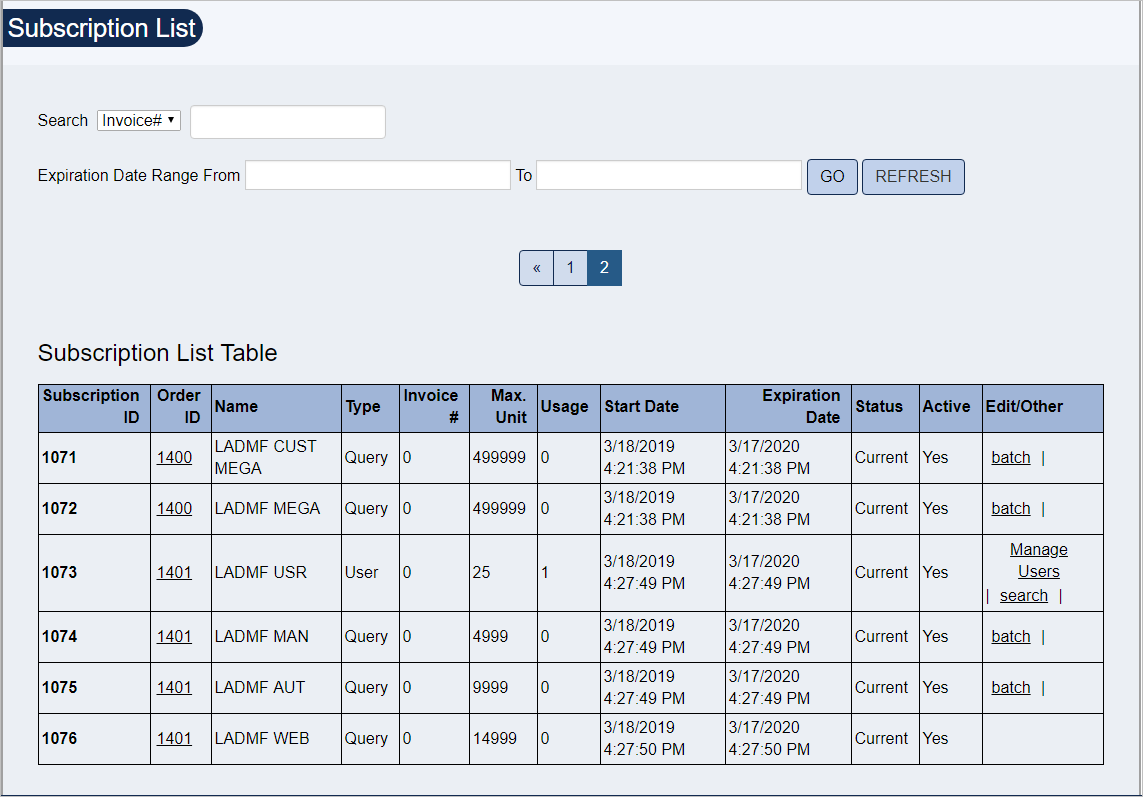
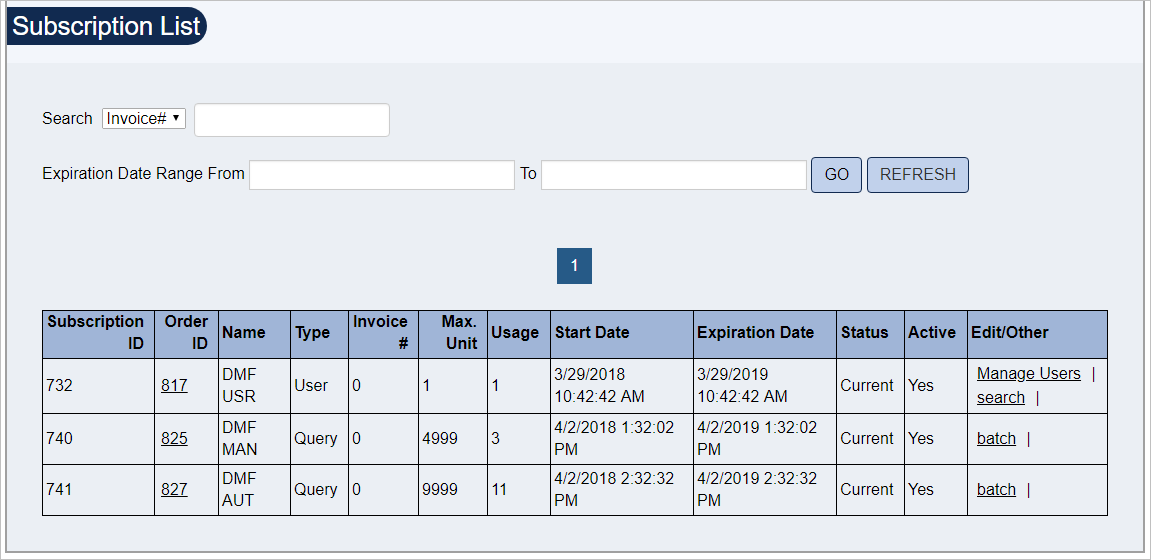
Once the order has been approved and processed, you'll see a 'My Subscriptions' link in the dark blue navigation menu:
If you click on the 'My Subscriptions' link, you will be able to see your Subscriptions you've purchased on the Subscription List. Your screen should look like this, depending on what you've purchased.
Managing Users
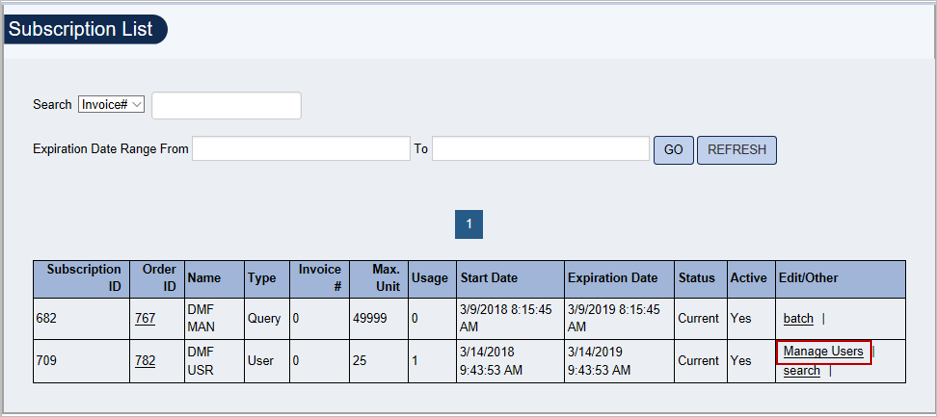
For certain Subscriptions, you are allowed multiple users to be able to use the Search functionality. These are for ordering subscriptions of 'Medium: Up to 15 Concurrent Users' and 'Large: Unlimited Concurrent Users'.
For the purposes of this document, we'll use the Medium order as our example. While logged in, once your order has been approved, you should be able to see your 'My Subscriptions' in the dark blue navigation menu, as shown above in that section.
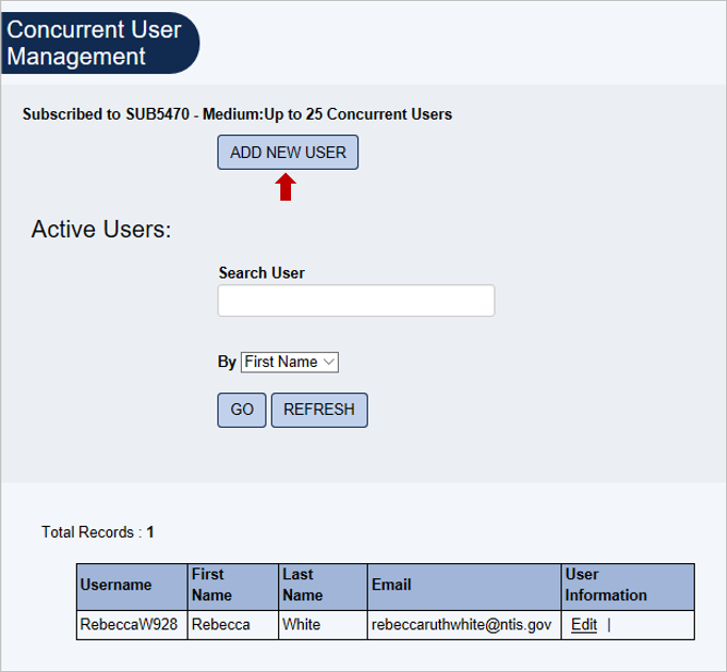
From you Subscriptions List, you can click on your Medium order to add users by using the 'Manage Users' link:
From here, you'll need to click on 'ADD NEW USER' under your subscription name at the top of the Concurrent User Management Screen.
Fill out all the information for your User on the Register screen, and click 'REGISTER' to add your user:
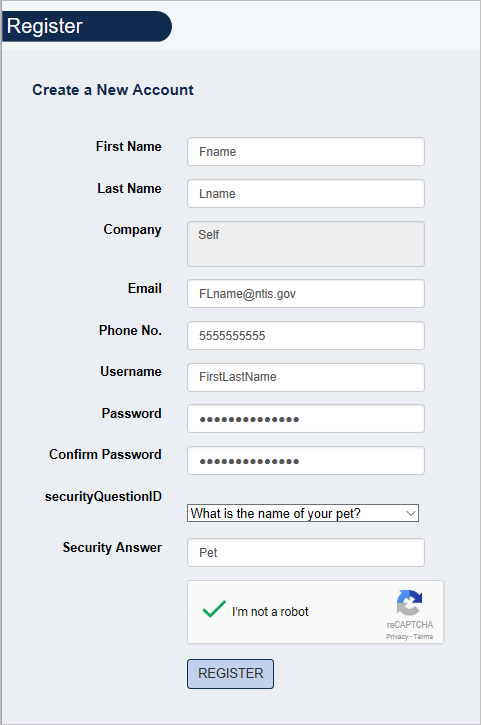
Your user should have their own unique Username, Password, and Email Address.
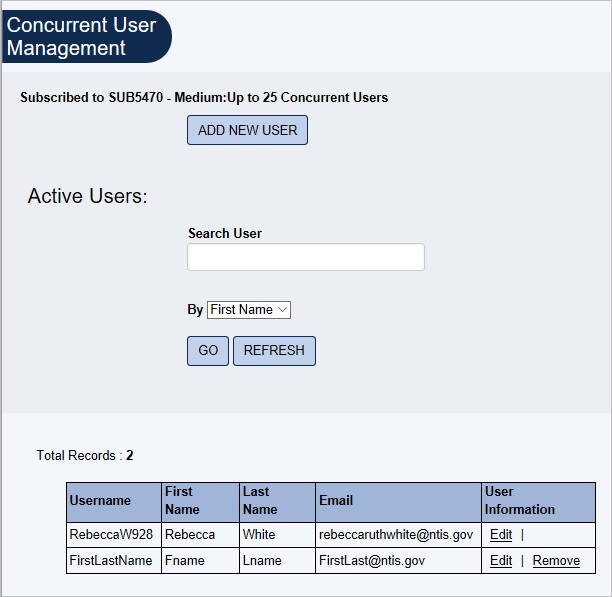
You should now see your added User under your Total Records:
The added user can now use the same Search functionality as the Customer Administrator. Again, the first registered user is the Customer Administrator and can add or remove the additional Search Users. The second user and any subsequently added users are not Customer Administrators, and therefore are restricted to search functionality only.
Part 3 – Searching the Limited Access Death Master File site
-
How to Search
Once you have an active Subscription and Login again with your credentials, you should see the 'My Subscriptions' link in the upper dark blue navigation menu.
Step 1: Click 'My Subscriptions'.
This link will show you what subscriptions you have been approved for and should resemble the following:
Step 2: Select the subscription you wish to use search in by clicking 'Search' on the far right.
Step 3: This will bring you to your Search screen where you will input your search criteria.

Click 'SEARCH' once you've entered your data.
Search Guidelines
To perform a Search, you can populate any or all fields. If you enter a Social Security Number, the LADMF will search for that SSN only, ignoring any values you enter in the other fields.
If you search only by Year of Death, the search result set will include everyone who died within that year. Consider narrowing your searches by adding more search values, to receive more selective results.
Search Scenario 1:
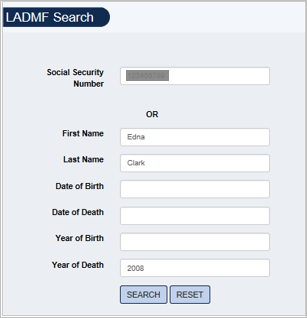
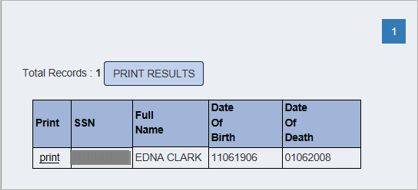
We will be using the following scenario: Suppose you wish to confirm the date of death of Edna Clark, 9-digit SSN, who died during 2008 (we are not showing actual SSN values due to PI concerns).
Rather than searching for just "2008" in the Year of Death field, which returns everyone who died that year, fill in as many fields as you know (such as First and Last Name, Social Security Number, in addition to Year of Death).
The results should appear under your search fields resembling the following:
You can clear the fields by clicking the 'RESET' button on the LADMF Search page underneath the search criteria fields. You would have had the same result if you had searched using SSN only.
LADMF supports a partial-value-search in the First Name and Last Name fields, so if you do not know the full name, you can search with just some of the letters. This could be useful if - for example - you are unsure if the person you are searching for had a first name of "Jonathan" or "John"; just search for "Jo". But for this scenario, let's continue knowing the full First Name and Last Name and the Year of Death.
Search Scenario 2:
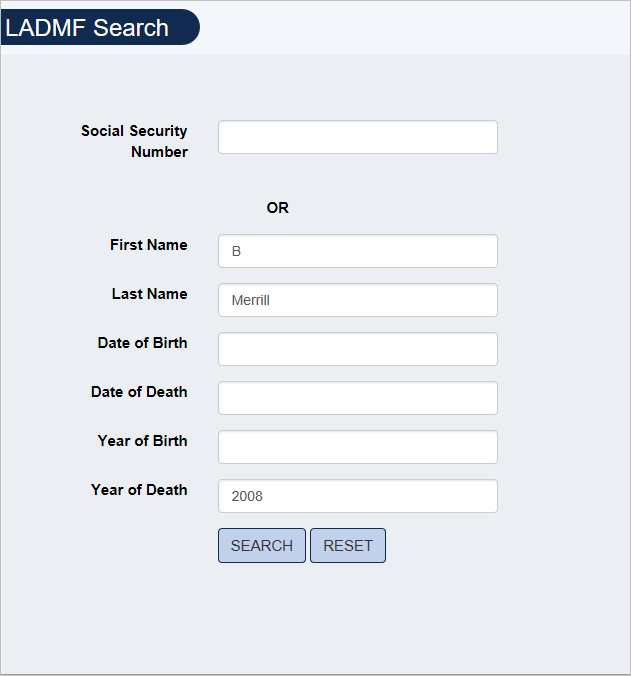
For another Search scenario, suppose we are seeking to confirm the death (if they are, in fact, deceased) and the Date of Death of a person, but are unsure of their legal first name. For example, we are looking for a B. Merrill who died in 2008.
Partial value (sometimes called 'wild card') searches are supported, so searching for First Name "B", Last Name "Merrill", and Year of Death "2008", will return all those with a last name of Merrill and "B" somewhere in their first name, who died in 2008.
The results should resemble the following:
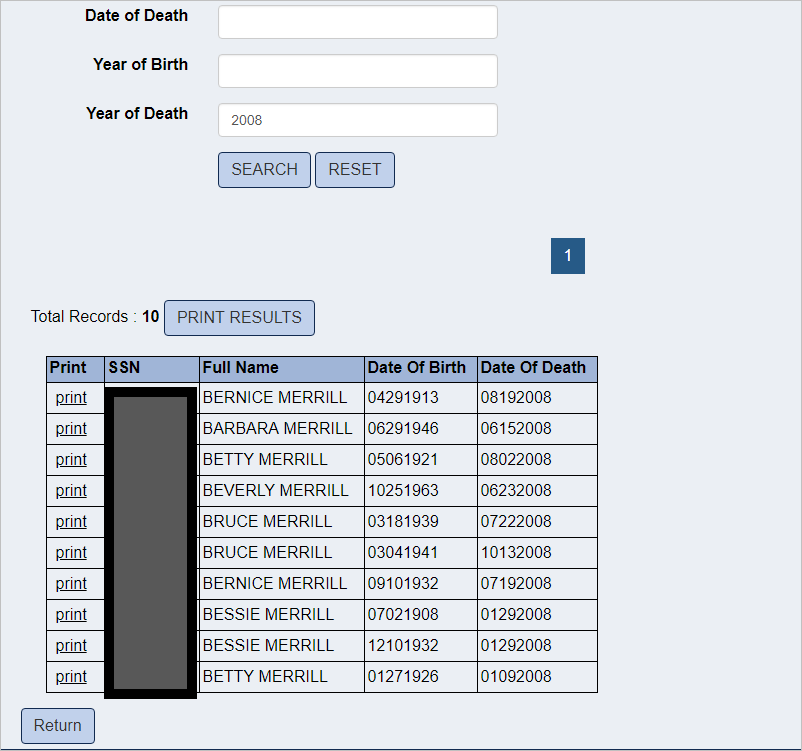
Note: You will will be able to see SSNs, but we are covering that info in this example. Results will populate 10 records per page. To see results beyond the first ten, select the second page by clicking '2' above the search results table.
You can also try searching for the Last Name "Merrill" in "2008", which returned 314 results, and you would have to scroll through looking for the correct person. Without the "B" in the First Name field, you will have many more results returned. Similarly, if you know the first name has "Bo" in it, and search using that, you will greatly reduce the result set to scroll through.
This can be quite cumbersome, and you may be uncertain of the exact correct record result, so having data for more fields as search criteria greatly increases your odds of narrowing your down your search result records.
Note: For any questions regarding Subscriptions, please contact: [email protected]
Part 4 – Scheduling Batch Queries
-
How to Use the Manual Batch Processing Products (DMF MAN)
After purchasing the product, and after the order has been processed, click on the 'My Subscriptions' link on the navigation bar.

In your list of subscriptions displayed, you should see a subscription for 'DMF MAN'.
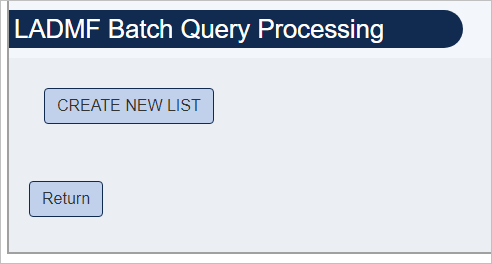
Click on the 'batch' link for that DMF MAN product. You will see a screen similar to the following (your screen will not have any existing lists if you have not yet created any).
Recall that the DMF MAN subscription is for a batch query processed on an ad hoc basis. Use Manual Batch Processing if you need to check a large list of numbers, such as when checking voter registration lists before an election. You could get a subscription for 'x' number of queries each year to check your list. Don't use Manual Batch Processing to check large lists repeatedly or to check just a few numbers at a time.
Click on the 'CREATE NEW LIST' button and you should see the following:
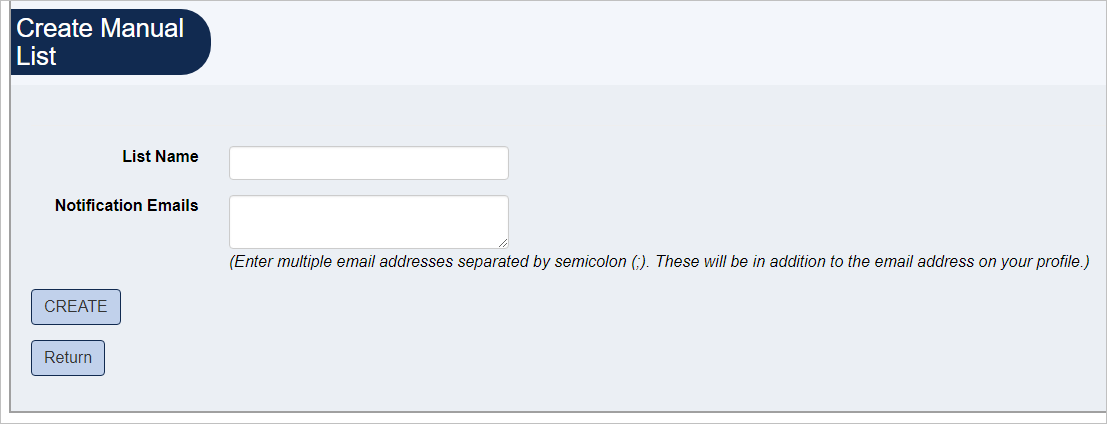
Give your list a name in the 'List Name' field. Note that only letters, numbers and spaces are allowed in this field.
You can add email addresses in the 'Notification Emails' field. The email address associated with the user you logged in under will automatically receive notification when the batch has run.
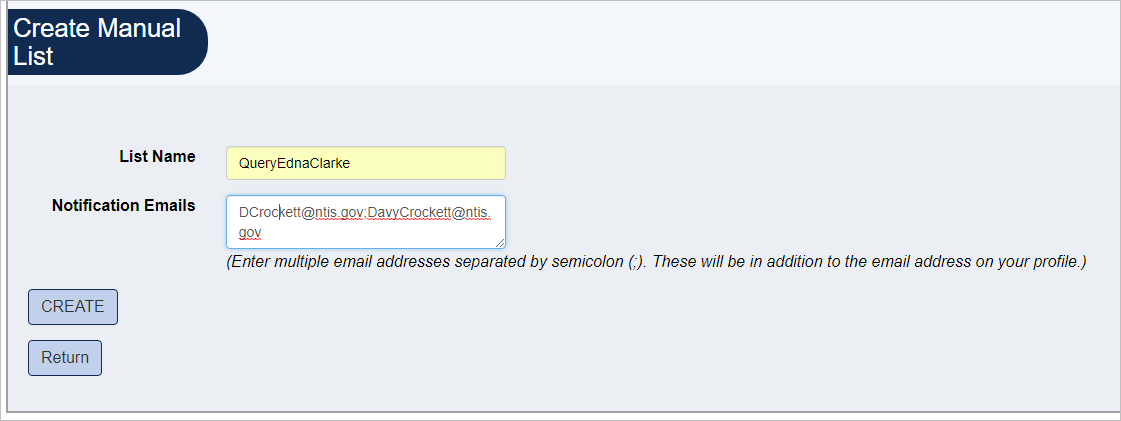
Click on the 'CREATE' button. You should see the following:
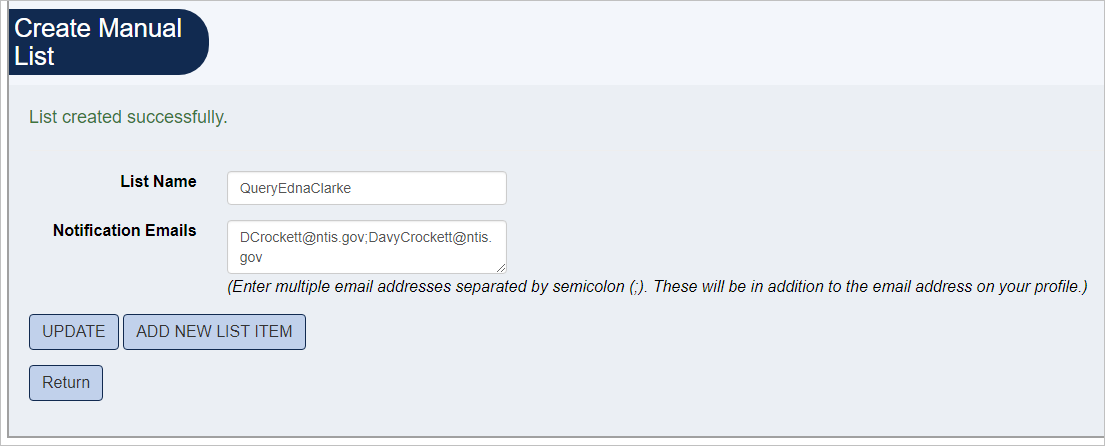
Use the 'UPDATE' button to change the list name, or to change Notification Emails. To enter the search criteria, click on the 'ADD NEW LIST ITEM' button.
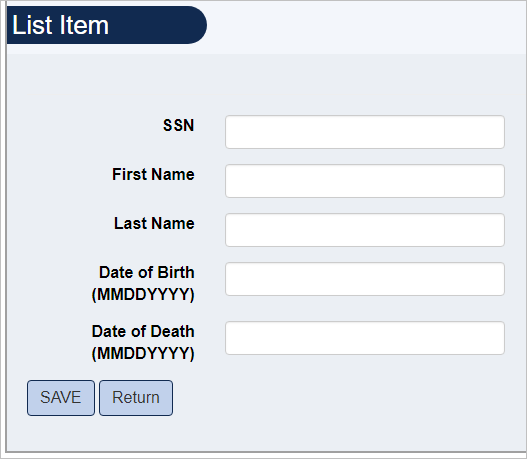
Enter search values on this screen as you would when using the interactive interface.
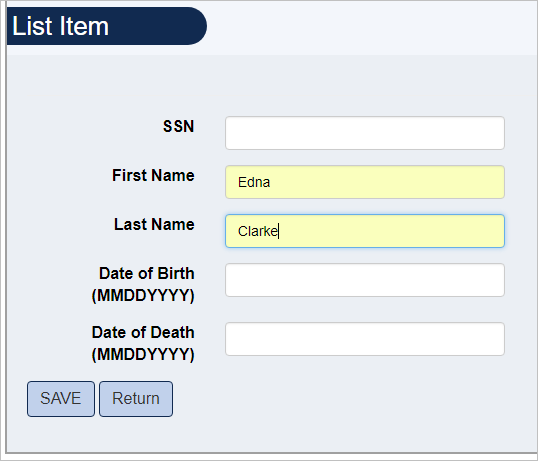
Enter as many searches as you want simply by adding values, clicking on 'SAVE' and then clicking on 'ADD NEW LIST ITEM'. Here we are searching for Edna Clarke, then Edna Clark, then Edna. Be careful with your searches, as the preceding will return a large number of records.
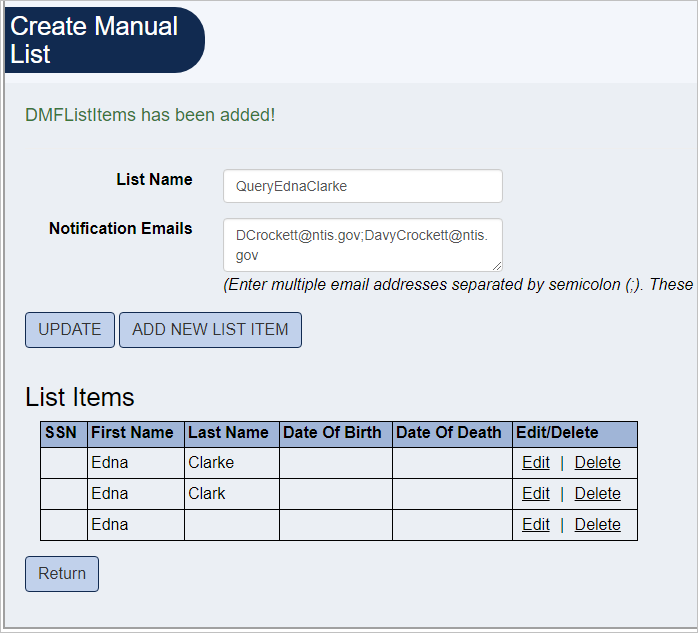
When you have added all the searches you wish, click on 'Return'. This will take you to the next screen.
And you can click on the 'Process' link on the right for the search you wish to run. When the searches have been processed by the system, the screen updates to the following:
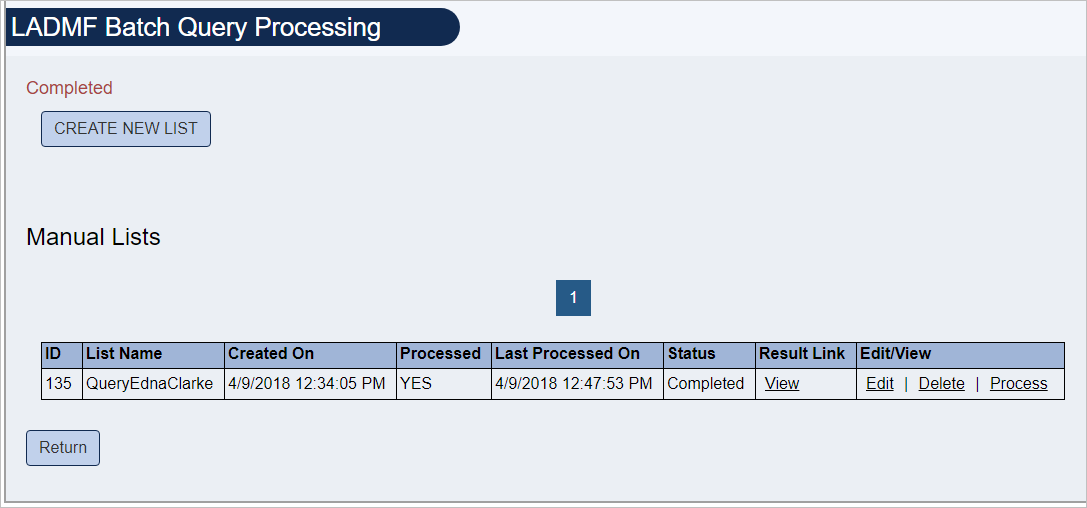
And you can click on the 'View' link to see the result.
In this case, the results returned are below.
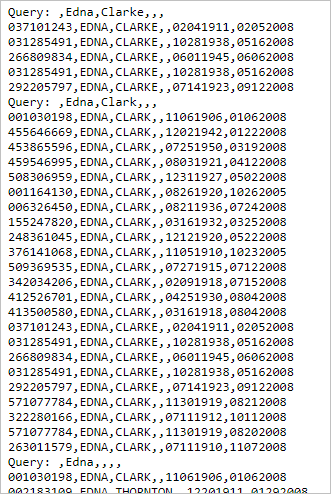
Note that the above is only part of the first screen of results. The result file stays online and you can access it when you login again.
In summary, this Search Product allows you to create a file (batch) of people you wish to search for using the web interface, and then to submit that batch, giving you the results in an online file.
-
Scheduling Batch Queries
The three scheduled batch products are:
- Automated Batch Processing (DMF AUT)
- Big Data Search Products (DMF MEGA)
- Custom Big Data Search Products (DMF CUST MEGA)
While they are tailored for different purposes (please review the product descriptions, DMF MEGA is for SSN-based queries, DMF CUST MEGA is for queries using other fields), they are similar in that in all three the user schedules the batch query. Batch queries are run "first thing in the morning" just after midnight. They can be scheduled to run 'Once', 'Weekly' on the same day each week, or 'Monthly' on a specific day of a particular month.
This section explains how to schedule the batch query for all three of these products using the DMF AUT product as an example.
After purchasing the product, and after the order has been processed, click on the 'My Subscriptions' link on the navigation bar. You should see a screen similar to the one below. You are looking for the 'DMF AUT' product.
The product we are looking for is "DMF AUT".

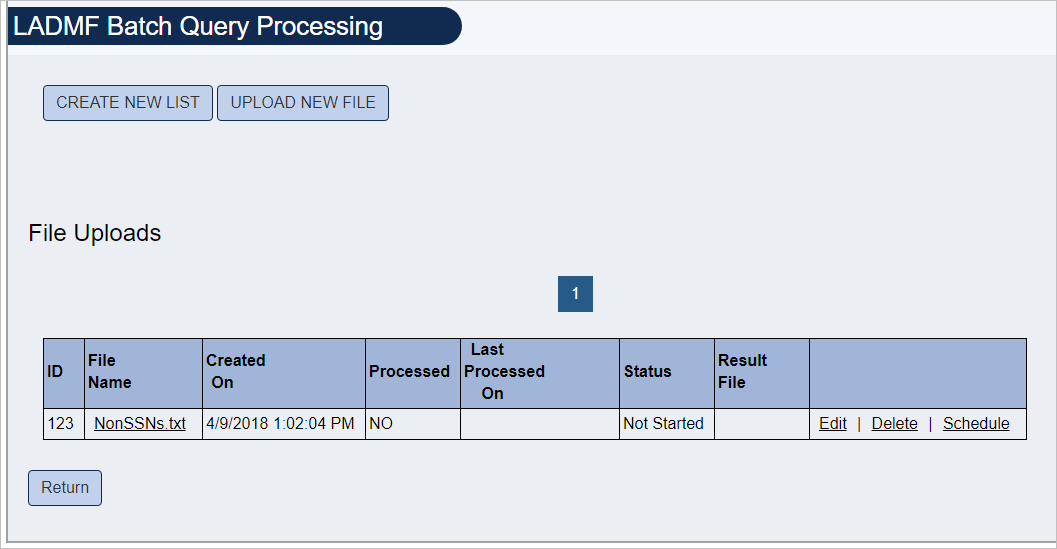
Click on 'batch'. You should see:
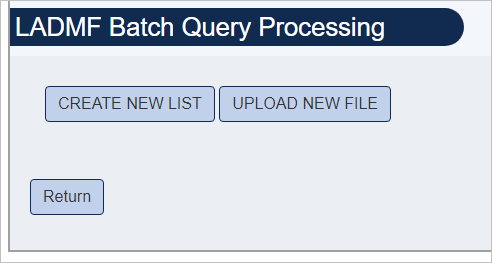
Notice that you have two options:
1. You can 'CREATE NEW LIST', enter searches into an online file and then run that file as a batch. This process is similar to the Manual Batch subscription (DMF MAN), except that you will schedule when the batch is to be processed. You can review the DMF MAN portion of the manual for details.
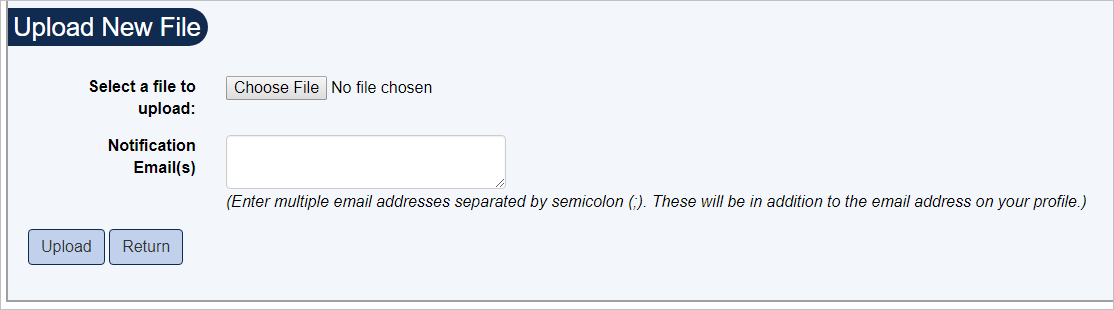
2. You can 'UPLOAD NEW FILE', uploading a file of searches (queries) that you have already created in your system. The file you upload needs to be a text file, and in a particular format:
The format of text file is: {First Name},{Last Name},{Date of Birth},{Date Of Death}
For example:
Edna,Clark,,01062008
Edna,Clark,12021942,
E,Clark,,01062008If you are querying by SSN the format of the text file is:
SSN1
SSN2
SSN3
For example:
123456789
234567890
345678901
Save that in a .txt file on your system, then select it when prompted after clicking on 'UPLOAD NEW FILE'. We are using a file called ".txt" in this example.

Click on 'Choose File'.
Depending on the Operating System on the computer you are using, you will see something like the following:

Click on the file you want (we are selecting Non-SSNs in this example).
Click on 'Return', which gets you to:
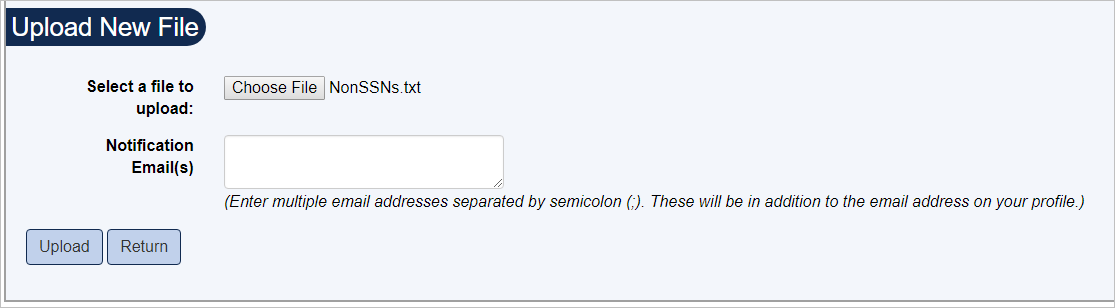
You can enter email addresses that will be informed when your query runs. By default the email address associated with the user you are logged in as, will be notified.
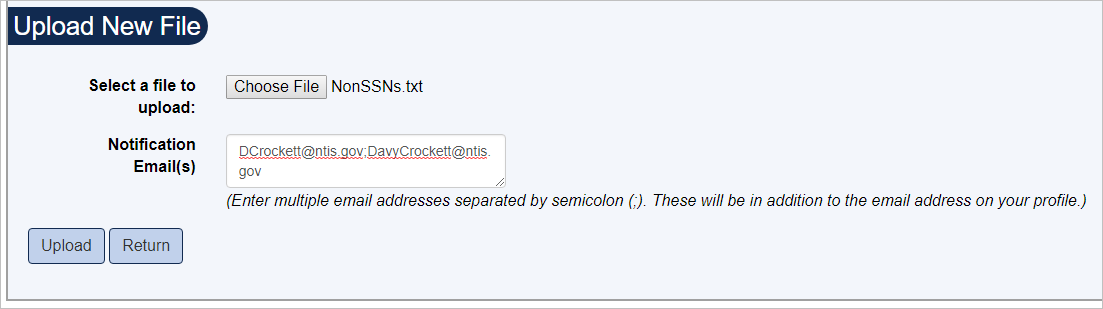
Click on the 'Upload' button to upload your selected file.
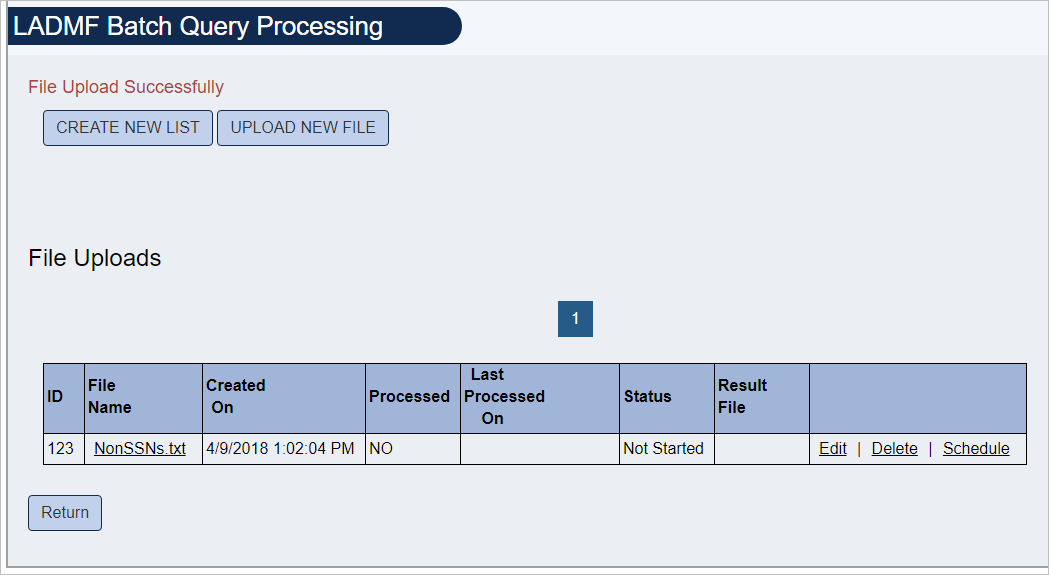
And now you can either 'Edit', 'Delete', or 'Schedule'. Edit takes you back to the screen to upload a file and enter email addresses. Delete will do just what you expect, delete what you have entered so far. Schedule is where you schedule when you want your query processed.
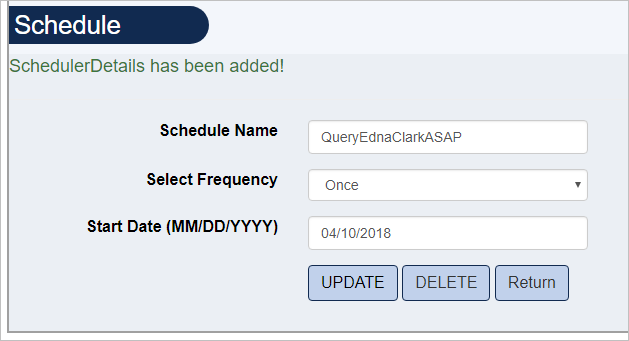
Click on 'Schedule', which will get you to:
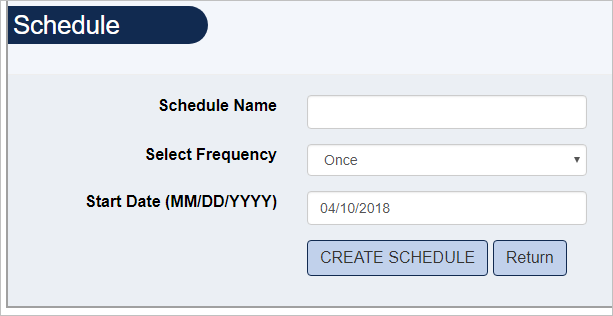
Enter a name for the schedule. A distinct name is useful if you run multiple batch queries.
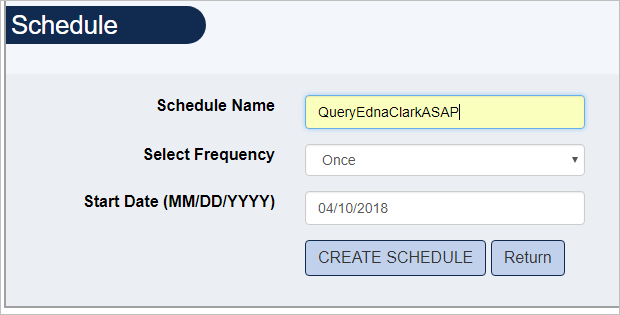
You can schedule your batch query to be run Once, Weekly or Monthly before specifying a start date. The start date defaults to tomorrow’s date and will run first thing in the morning on that date (just after midnight).
Select 'Once' to run the query once, first thing in the morning (just after midnight) on your chosen Start Date. The Start Date needs to be in future (tomorrow works).
Click on the 'CREATE SCHEDULE' button to schedule your query.
Then click on 'Return' to get back to:

Besides 'Once' you can schedule your query to run 'Weekly' or on a given day of the month.
Select 'Weekly' to schedule a query that runs once a week, on the same day of the week, every week. You will be asked to select a day of the week for the query to be run. Again, it will run first thing in the morning (just after midnight) on that day of the week.
Select 'Monthly' to schedule a query that runs once in a selected month, on a specified day of that month. You will be asked to select which day of the month the query is to be run. Again, it will run first thing in the morning (just after midnight) on that day of that month. When choosing a day of the month, consider that not all months have a 29th, 30th, or 31st day.
Click on 'UPDATE' when you have entered the schedule you want. Then click on 'Return', which should bring you back to the following:
From here you can create new query lists or upload new query files.
Your query has been scheduled (in the example above it is scheduled to run once, on 4/3/2018, and will run first thing in the morning on that date. When you log in and view your subscription AFTER the query was scheduled to run you should see a variant of the above screen with an option to click on the Result Link.
So if we log in again on the day the query ran, we could browse to 'My Subscriptions', select the appropriate product, and then see something like:

Notice that this screen differs from the way it appeared prior to the query being run. There is a date in the 'Last Processed On' column, the 'Status' is 'Completed', and there is a link under 'Result File'. If we click on that link we see something like the following:
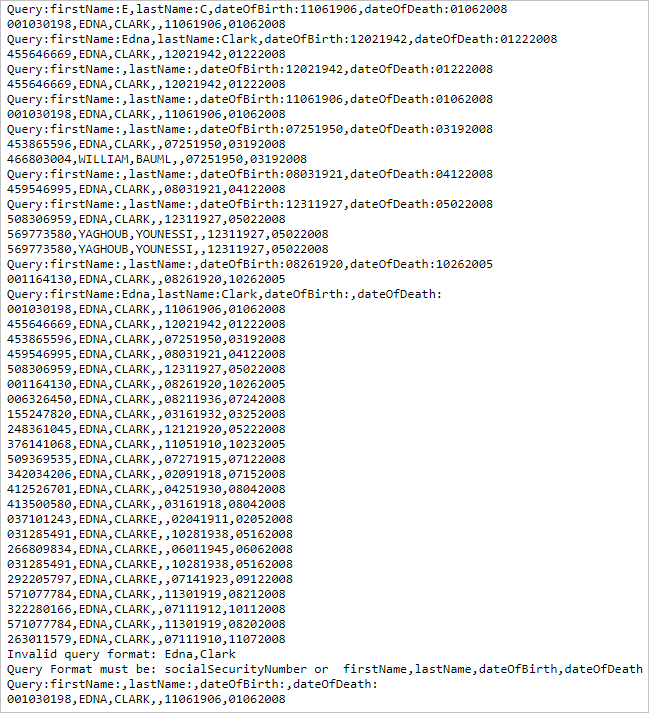
These are the results from the query that was uploaded and scheduled.
Appendix A – Product Descriptions
There are six LADMF Search Products, and each Search Product comes in three sizes; small, medium and large.
Annual Subscription to Unlimited Manual Searches (DMF USR)
Query the SSA LADMF via the LADMF website. Use this federal data product to search for individual Social Security Numbers (SSNs) as needed. The small, medium and large 'sizes' refers to the number of simultaneous users. There is no limit on sequential users. Use this product to look for different SSNs regularly. This annual subscription allows as many users as you choose, [small, medium or unlimited] to have access to the Social Security Administration's Limited Access Death Master File (LADMF). Each user may log in and look for individual SSNs using the advanced search software provided. Credit card companies, banks and other organizations whose employees at various branches or sites check different numbers frequently should use this product.
Manual Batch Processing - Annual Subscription Based on Number of Queries (DMF MAN)
Query on demand using a source file (which you key in to the LADMF system) for what you wish to find. Your file is processed as a 'batch' and the results stored in a file on LADMF which you can access. Use Manual Batch Processing if you need to check a large list of numbers occasionally, such as on voter registration lists before an election. You could get a subscription for 'x' number of queries each year to check your list. Do NOT use Manual Batch Processing to check large lists repeatedly, nor to check just a few numbers at a time.
Automated Batch Processing - Annual Subscription Based on Number of Queries for Single User (DMF AUT)
Schedule queries using a source file for what you wish to find. Use Automated Batch Processing to check large lists of numbers regularly (e.g. a pension fund checking if monthly benefits checks recipients are still alive). The fund could run a list of the recipients weekly or monthly. Don't use Automated Batch Processing if you don't need to run the same numbers repeatedly. Nor should you use them to run searches a couple of times a year, or to check a few numbers at a time.
Integrated Searches – Annual Subscription Based on Number of Queries for a Single User (DMF WEB)
Query via API. Use this product if you will write your own program to search the database or if you wish to integrate LADMF searches with an existing program, (e.g. to verify the SSN of a new bank account holder automatically while setting up the account, or to check voter registration applications). Don't use Web Service if you don't write your own integration programs and don't need to automate SSN checking with an existing program. Web Services can be implemented with any language platform. There is a separate document on how to use the API we provide.
Big Data Search Products (DMF MEGA)
High volume query by SSN. To make more than 400,000 SSN queries you must purchase a Mega Search product. Users can upload a text file of SSNs to be checked against the LADMF, and the number of queries made will be deducted from the overall subscription count. The search results will be posted and the files will be accessible online. We will notify you by email when your results are ready. Then just log in and get the results from the Search Results Page.
Custom Big Data Search Products (DMF CUST MEGA)
High volume query by fields other than SSN. To purchase more than 100,000 queries if you don't have a list of SSNs, you must purchase a Custom Mega Search product. Just login and either upload a text file of the filter fields or enter them manually online. The program will check the filters against the LADMF, and the number of queries you make will be deducted from the subscription count. The search results will be posted and the files will be accessible online. We will notify you by email when your results are ready. Then just log in and get the results from the Search Results Page.
The format of text file is: {First Name},{Last Name},{Date of Birth},{Date Of Death}
The fields are comma-delineated with no spaces. If you don't have a valid value for any of these fields, you can leave them blank. For example, if you only know Last Name and Date of Birth for your query, you may enter it in the text file as: Last Name, DOB, (Please note to keep the commas intact). There should be only one query per line, with a hard carriage return (enter) after each.
Note: For any questions regarding Subscriptions, please contact: [email protected]
Footnotes
- A 'CAPTCHA' is an online test designed so that humans, not computers, are able to pass it, used as a security measure and usually involving a visual-perception task. Return to footnote.
- The Cutomer ID and Legacy ID fields track customer numbers in other systems. They are populated by NTIS staff and systems and cannot be edited by the customer. Return to footnote.